Mini Charcuterie Boards for Lovers
Highlighted under: Comfort Cravings Kitchen
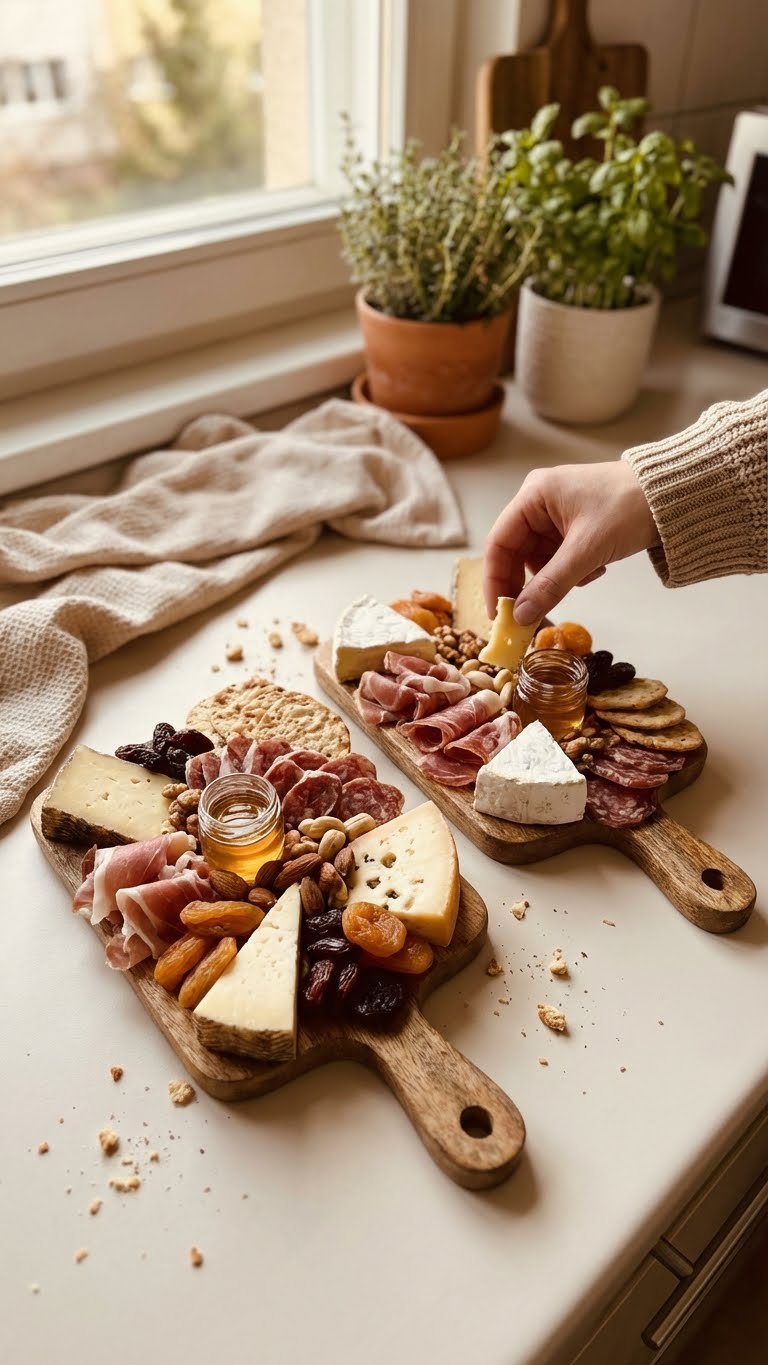
I love creating mini charcuterie boards for special occasions or just a romantic evening at home. They’re the perfect way to showcase a variety of flavors, and I love how customizable they are! Whether it’s a date night or a celebration with friends, these boards always impress. I recommend using a combination of meats, cheeses, and fresh fruits for a balanced taste. Plus, they make a great centerpiece. Let’s dive into how to make these irresistible mini boards!
When I first experimented with mini charcuterie boards, I was amazed at how quickly they came together. I arranged some of my favorite ingredients, and it turned into a delightful spread that was both visually stunning and delicious. I also learned that the key is in the balance—pairing sharp cheeses with sweet fruits elevates the entire experience.
On our last date night, I included a variety of textures and flavors, which sparked great conversation. I recommend trying different combinations of meats and cheeses. It’s fun to let everyone build their own little bites!
Why You'll Love This Recipe
- Perfectly balanced flavors for every palate
- Visually stunning presentation that impresses
- Great for sharing and sparking conversation
Creating Visual Interest
Visual appeal is a crucial aspect of a mini charcuterie board. Aim for a variety of shapes, colors, and textures when arranging your ingredients. When selecting cheeses, consider not only flavor but also how they look on your board: the creamy white of Brie contrasts beautifully with the rich yellow of aged cheddar and the bluish specks of Gorgonzola. Create height by stacking some items, such as rolling the prosciutto or folding the salami, which adds dimension and encourages diners to explore different flavors.
Consider the placement of each ingredient to create a balanced board. Group similar textures, like the creamy cheeses on one side and the crunchy nuts on the other. Play with different serving sizes. I like to slice apples into thin wedges and arrange them in a fan shape for a lively effect. Colorful grapes can be clustered together for a pop of brightness, while olives could be placed in a small bowl for easy serving, making it simple for guests to pick their favorites.
Flavor Pairing Insights
Understanding the nuances of flavor pairing can elevate your mini charcuterie board. For example, the creaminess of Brie pairs exceptionally well with the sweetness of honey and the saltiness of prosciutto. On the other hand, Gorgonzola, with its bold flavor, matches well with fig jam; the sweetness balances the pungency, making for a delightful bite. Always consider including a balance of flavors: tangy, creamy, sweet, and salty should all have their place.
Don't hesitate to try different ingredient combinations. If you're looking for a dairy-free alternative, consider using nut-based cheeses. They offer similar creaminess without the lactose, while still providing varied textures. You can also substitute the traditional meats with smoked tofu or herbed seitan for those following a vegetarian or vegan diet. Just ensure flavors are well-balanced and complementary to maintain that wow factor at your gathering.
Storage and Preparation Tips
If you're preparing your mini charcuterie boards ahead of time, be mindful of ingredient storage to maintain freshness. I recommend assembling the board within 2-4 hours of serving for optimal taste. However, if you're short on time, you can prep ingredients like sliced cheeses and meats a day in advance. Keep them tightly covered in the refrigerator to prevent drying out. Fruits should be prepared fresh as they tend to brown; a splash of lemon juice on cut fruits can help prevent this.
To make your board easy to transport, consider using small, stackable containers for the dip and smaller items like nuts. Whole fruits, cheeses, and meats can be packed tightly together in a terracotta or wooden tray. When ready to serve, simply arrange them on the board. This approach works especially well for picnics or outdoor gatherings, ensuring that everything stays fresh and delicious until the moment you’re ready to indulge.
Ingredients
Gather these ingredients to create your mini charcuterie boards:
Cheeses
- Brie cheese
- Aged cheddar
- Gorgonzola
Meats
- Salami
- Prosciutto
- Capicola
Fruits and Nuts
- Grapes
- Sliced apples
- Almonds
- Walnuts
Dips and Extras
- Honey
- Fig jam
- Olives
- Crackers
These ingredients will help you create a delightful and beautiful spread.
Instructions
Follow these steps to assemble your mini charcuterie boards:
Choose Your Board
Select a small wooden or slate board as your base. Each board should be about 12 inches in size for a good layout.
Arrange the Cheeses
Start by placing the cheeses on the board, spaced out evenly. Cut some pieces into smaller wedges for easy serving.
Add the Meats
Next, fold or roll the meats and place them near the cheeses. Ensure they complement the cheeses for better flavor pairing.
Incorporate Fruits and Nuts
Fill in spaces with fruits and nuts. Scatter grapes and sliced apples around the board to add color and freshness.
Dips and Extras
Finally, add small bowls of honey, fig jam, or olives, and place crackers around to complete the look.
Your mini charcuterie boards are now ready to serve!
Pro Tips
- Feel free to mix and match your favorite ingredients based on what you have on hand. Seasonal fruits can add a fresh twist.
Ingredient Insights
Each component of your mini charcuterie board plays a specific role, from flavor balance to texture contrast. Cheeses provide a creamy base for your palate, while the meats add savory richness. The inclusion of fresh fruits not only enhances the visual appeal but also serves to cleanse the palate between bites. Nuts offer a satisfying crunch, creating a well-rounded tasting experience that encourages conversation and exploration of flavors.
When selecting ingredients, don't overlook seasonal fruits, which can dramatically enhance the freshness of your board. For instance, pairing brie with figs in the fall can elevate your flavors even further. Always be open to swapping in local ingredients that reflect what's available in your area, as it can lead to delightful discoveries and unique combinations that surprise your guests.
Serving Suggestions
Mini charcuterie boards are versatile and can be served in various ways. Enhance your presentation by using small tasting plates alongside the board, allowing guests to create their personal servings. I also like to provide toothpicks or small skewers, making it easy for guests to enjoy the different items without having to use utensils. This communal style of eating encourages conversation and enhances the experience.
For those looking to create a themed board, consider regionally inspired variations. For instance, a Mediterranean-themed board could feature olives, feta, and sun-dried tomatoes alongside prosciutto and fresh figs. Experimenting with themes can spark creativity and excitement in assembling your boards, ensuring that they remain a delightful centerpiece at every gathering.
Questions About Recipes
→ Can I make these ahead of time?
Yes! You can prepare the boards a few hours ahead. Just cover with plastic wrap and refrigerate until serving.
→ What if I have dietary restrictions?
You can easily customize the ingredients by substituting with plant-based cheeses and meats, or gluten-free crackers.
→ How do I choose the right cheese?
Aim for a variety of textures and flavors—try to include a soft cheese, a hard cheese, and a blue cheese if possible.
→ Can this be a meal on its own?
Absolutely! Mini charcuterie boards can serve as a light meal or snack, especially if you include more substantial items.
Mini Charcuterie Boards for Lovers
Created by: The Brothrecipes Team
Recipe Type: Comfort Cravings Kitchen
Skill Level: Beginner
Final Quantity: 4 boards
What You'll Need
Cheeses
- Brie cheese
- Aged cheddar
- Gorgonzola
Meats
- Salami
- Prosciutto
- Capicola
Fruits and Nuts
- Grapes
- Sliced apples
- Almonds
- Walnuts
Dips and Extras
- Honey
- Fig jam
- Olives
- Crackers
How-To Steps
Select a small wooden or slate board as your base. Each board should be about 12 inches in size for a good layout.
Start by placing the cheeses on the board, spaced out evenly. Cut some pieces into smaller wedges for easy serving.
Next, fold or roll the meats and place them near the cheeses. Ensure they complement the cheeses for better flavor pairing.
Fill in spaces with fruits and nuts. Scatter grapes and sliced apples around the board to add color and freshness.
Finally, add small bowls of honey, fig jam, or olives, and place crackers around to complete the look.
Extra Tips
- Feel free to mix and match your favorite ingredients based on what you have on hand. Seasonal fruits can add a fresh twist.
Nutritional Breakdown (Per Serving)
- Calories: 250 kcal
- Total Fat: 18g
- Saturated Fat: 9g
- Cholesterol: 35mg
- Sodium: 440mg
- Total Carbohydrates: 15g
- Dietary Fiber: 2g
- Sugars: 6g
- Protein: 9g