Black Forest Cheesecake: An Incredible Ultimate Recipe
Black Forest Cheesecake is an amazing dessert that combines rich chocolate, creamy cheesecake, and the delightful tartness of cherries. This unique treat captures the beloved flavors of the classic Black Forest cake while transforming them into a creamy, decadent cheesecake. With its smooth texture and visually stunning presentation, Black Forest Cheesecake is bound to impress anyone who takes a bite. It’s perfect for celebrations, gatherings, or just a special treat to indulge yourself after a long day.
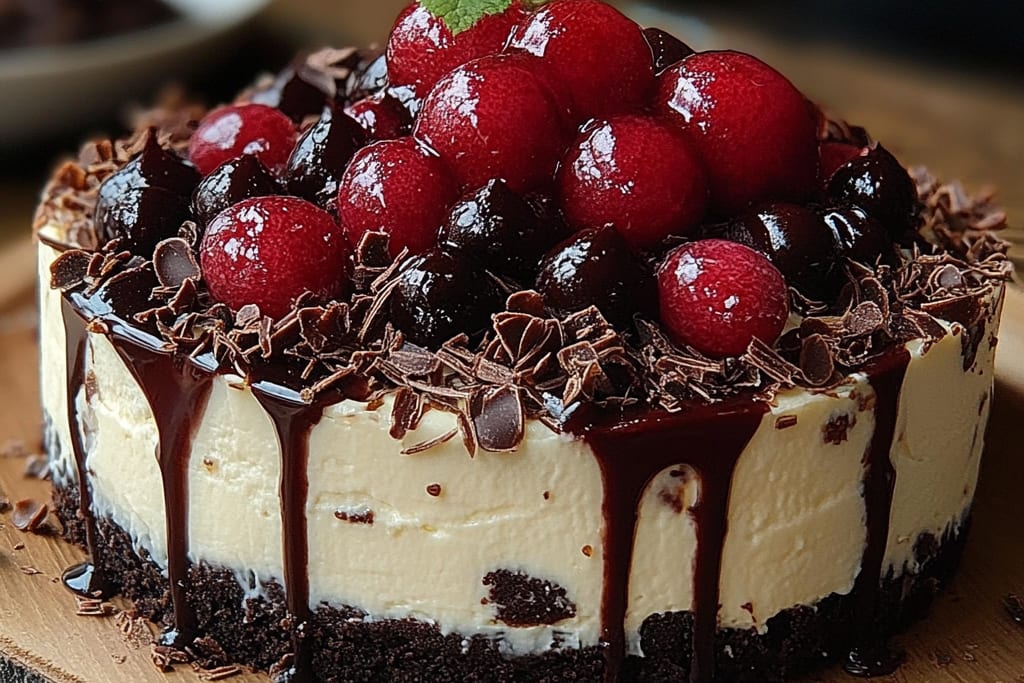
The fusion of flavors in Black Forest Cheesecake makes it a standout dessert. The chocolate crust cradles the velvety cheesecake filling, while the cherry topping adds a burst of freshness. This cheesecake isn’t just a dessert; it’s an experience that reflects the harmony of sweet and tart notes, making it a beloved choice for many. In this guide, you will discover why this recipe is so extraordinary, how to prepare it from scratch, and expert tips for serving. Whether you’re an experienced baker or a novice in the kitchen, this Black Forest Cheesecake recipe will guide you through to delicious success.
With each mouthful, you’ll find yourself transported to the enchanting Black Forest region of Germany, where this delightful dessert is said to have originated. The combination of chocolate, cherries, and cream will evoke feelings of joy and nostalgia. Read on to discover the secrets of crafting this incredible dessert!
Why You’ll Love This Recipe
Creating your own Black Forest Cheesecake opens up a wonderful world of flavor and texture. Here are several reasons why this recipe will steal a piece of your heart:
1. Rich Flavor Profile – The combination of chocolate, cream, and cherries creates a symphony of tastes that are both indulgent and satisfying.
2. Decadent Texture – The contrast between the creamy cheesecake and the crunchy chocolate crust sets this dessert apart from traditional cheesecakes.
3. Simple yet Impressive – Even though it might seem complex, the steps are straightforward, allowing anyone to create a show-stopping dessert.
4. Versatile Decoration – The cherry topping offers an opportunity to play with presentation, giving you room to unleash your creativity.
5. Perfect for Special Occasions – Whether it’s a birthday, anniversary, or holiday gathering, this cheesecake makes a perfect centerpiece for your dessert table.
6. Leftovers Taste Amazing – If there’s any left, this cheesecake often tastes even better the next day, as the flavors meld beautifully overnight.
These features highlight why so many enjoy making and sharing Black Forest Cheesecake. This dessert will undoubtedly impress with its beautiful appearance and delicious flavors.
Preparation and Cooking Time
Preparing Black Forest Cheesecake takes a little time, but the end result is worth every minute. Here’s a breakdown of the time required:
– Preparation Time: 30 minutes
– Cooking Time: 60 minutes
– Cooling Time: 4 hours (or overnight for best results)
This approximate timeline ensures that you’re well-prepared for making this incredible cheesecake. The cooling time helps set the flavors perfectly.
Ingredients
– For the Chocolate Crust:
– 1 ½ cups chocolate cookie crumbs
– ½ cup unsalted butter, melted
– 2 tablespoons granulated sugar
– For the Cheesecake Filling:
– 24 ounces cream cheese, softened
– 1 cup granulated sugar
– 1 teaspoon vanilla extract
– 3 large eggs
– ½ cup sour cream
– ½ cup heavy cream
– ⅓ cup cocoa powder
– For the Cherry Topping:
– 1 can (15 ounces) cherry pie filling
– Extra cherries for garnish (fresh or maraschino)
– Whipped cream for serving (optional)
Step-by-Step Instructions
Creating this amazing Black Forest Cheesecake is easier than you might think if you follow these simple steps:
1. Preheat the Oven: Preheat your oven to 325°F (160°C).
2. Prepare the Crust: In a mixing bowl, combine chocolate cookie crumbs, melted butter, and sugar. Press the mixture firmly into the bottom of a 9-inch springform pan.
3. Bake the Crust: Bake the crust in the preheated oven for about 10 minutes, then remove it from the oven to cool slightly.
4. Make the Cheesecake Mixture: In a large bowl, beat softened cream cheese and sugar together until smooth. Add the vanilla extract and mix well.
5. Add Eggs: Incorporate the eggs one at a time, mixing on low speed after each addition until just blended. Avoid overmixing.
6. Combine Sour Cream and Heavy Cream: Stir in the sour cream, heavy cream, and cocoa powder until the mixture is smooth and creamy.
7. Pour the Batter: Pour the cheesecake filling over the cooled chocolate crust, smoothing the top with a spatula.
8. Bake the Cheesecake: Place in the oven and bake for 50-60 minutes, or until the center is slightly jiggly but not liquid.
9. Cool the Cheesecake: Turn off the oven and let the cheesecake cool in the oven with the door ajar for 1 hour.
10. Chill: Remove the cheesecake from the oven and refrigerate for at least 4 hours, or overnight for best results.
11. Add Cherry Topping: Once chilled, spread the cherry pie filling evenly over the top of the cheesecake.
12. Garnish and Serve: Before serving, garnish with fresh cherries and whipped cream if desired.
These easy-to-follow steps will guide you in creating a remarkable Black Forest Cheesecake that your friends and family will adore.
How to Serve
When it comes to serving Black Forest Cheesecake, presentation and pairing can make a significant impact on the overall experience. Here are some tips to ensure a memorable serving:
1. Cake Stand: Place your cheesecake on a decorative cake stand to elevate its appearance and highlight your culinary creation.
2. Generous Slices: Cut generous yet manageable slices, allowing guests to indulge without feeling overwhelmed.
3. Serving Accompaniments: Pair the cheesecake with freshly whipped cream, a drizzle of chocolate sauce, or a side of ice cream to enhance its richness.
4. Drink Pairings: Serve with a glass of dessert wine, coffee, or even a rich hot chocolate for a delightful combination.
5. Garnishing: For a visually stunning presentation, add chocolate shavings or cocoa powder on top of the whipped cream, along with fresh mint leaves.
Serving Black Forest Cheesecake becomes an opportunity to impress guests and create a beautiful memory around the table. Thoughtfulness in detail enhances this incredible dessert, making the occasion even more special.
Enjoy crafting and sharing this incredible dessert that blends tradition with a bit of flair!
Additional Tips
– Use Quality Ingredients: For the best flavor, select fresh cherries and high-quality cocoa powder. This will enhance the taste of your Black Forest Cheesecake dramatically.
– Let It Set: Patience is key. Allow the cheesecake to set for at least 4 hours, preferably overnight, to ensure a perfect texture.
– Try Different Toppings: Consider using chocolate shavings or a drizzle of chocolate sauce alongside the cherry topping for added visual appeal and flavor.
– Room Temperature Ingredients: Ensure that your cream cheese and eggs are at room temperature before mixing. This helps achieve a smooth batter without lumps.
– Avoid Overbaking: Keep an eye on the cheesecake during baking. It should have a slight jiggle in the center when you remove it from the oven.
Recipe Variation
Get creative and try these delightful variations of Black Forest Cheesecake:
1. White Chocolate Twist: Substitute regular cocoa powder with white chocolate or add melted white chocolate to the cheesecake filling for a unique flavor.
2. Miniature Versions: Create individual mini cheesecakes in muffin tins, adjusting the baking time accordingly for bite-sized treats.
3. Alcohol-Infused Version: Add a splash of cherry liqueur or rum to the cherry topping for a more mature flavor profile that elevates the dessert.
4. No-Bake Option: For a lighter take, opt for a no-bake version by using gelatin in the filling instead of baking it.
5. Flourless Version: Eliminate the cocoa powder and add melted dark chocolate to the batter for a rich, flourless cheesecake that still captures the essence of the original flavors.
Freezing and Storage
– Storage: Keep the Black Forest Cheesecake covered with plastic wrap or in an airtight container in the refrigerator. It will stay fresh for 4–5 days.
– Freezing: You can freeze slices of cheesecake for up to 3 months. Make sure to wrap each slice tightly in plastic wrap and then place them in a freezer-safe container to prevent freezer burn.
Special Equipment
To successfully prepare Black Forest Cheesecake, you’ll need a few essential tools:
– Springform pan for easy release after baking
– Mixing bowls for combining ingredients
– Electric mixer for a smooth filling
– Rubber spatula for scraping down the sides of the bowl
– Offset spatula for smoothing the cheesecake filling
– Measuring cups and spoons for precise ingredients
Frequently Asked Questions
What’s the best way to slice the cheesecake?
Use a hot, sharp knife for clean cuts. For best results, wipe the blade between slices.
Can I use fresh cherries instead of canned?
Absolutely! Fresh cherries are a great choice, but they will need to be pitted and cooked down with sugar to resemble the pie filling.
How do I prevent cracks in my cheesecake?
Avoid overmixing the batter and bake at a low temperature. Placing a pan of water in the oven while baking can also help maintain moisture.
Can I make this cheesecake gluten-free?
Yes, substitute the chocolate cookie crumbs with gluten-free alternatives, such as almond flour or gluten-free cookie crumbs.
Is it possible to adjust the sweetness?
Yes, you can reduce the sugar in the filling or topping based on your personal preference.
Conclusion
Black Forest Cheesecake is a delightful blend of flavors and textures that will leave a lasting impression on anyone who gets to taste it. With its rich chocolate crust, creamy filling, and tangy cherry topping, it captures the essence of the classic German dessert. Whether you serve it at a gathering or enjoy it as a special treat at home, the allure of this cheesecake makes it a beloved choice for all occasions. Follow this recipe and tips, and you’ll be rewarded with a show-stopping dessert that’s sure to delight!